dms-view
Interactive visualization tool for deep mutational scanning experiments.
Try out dms-view!//dms-view.github.io
Getting startedTutorial
Upload your own data
Case studies
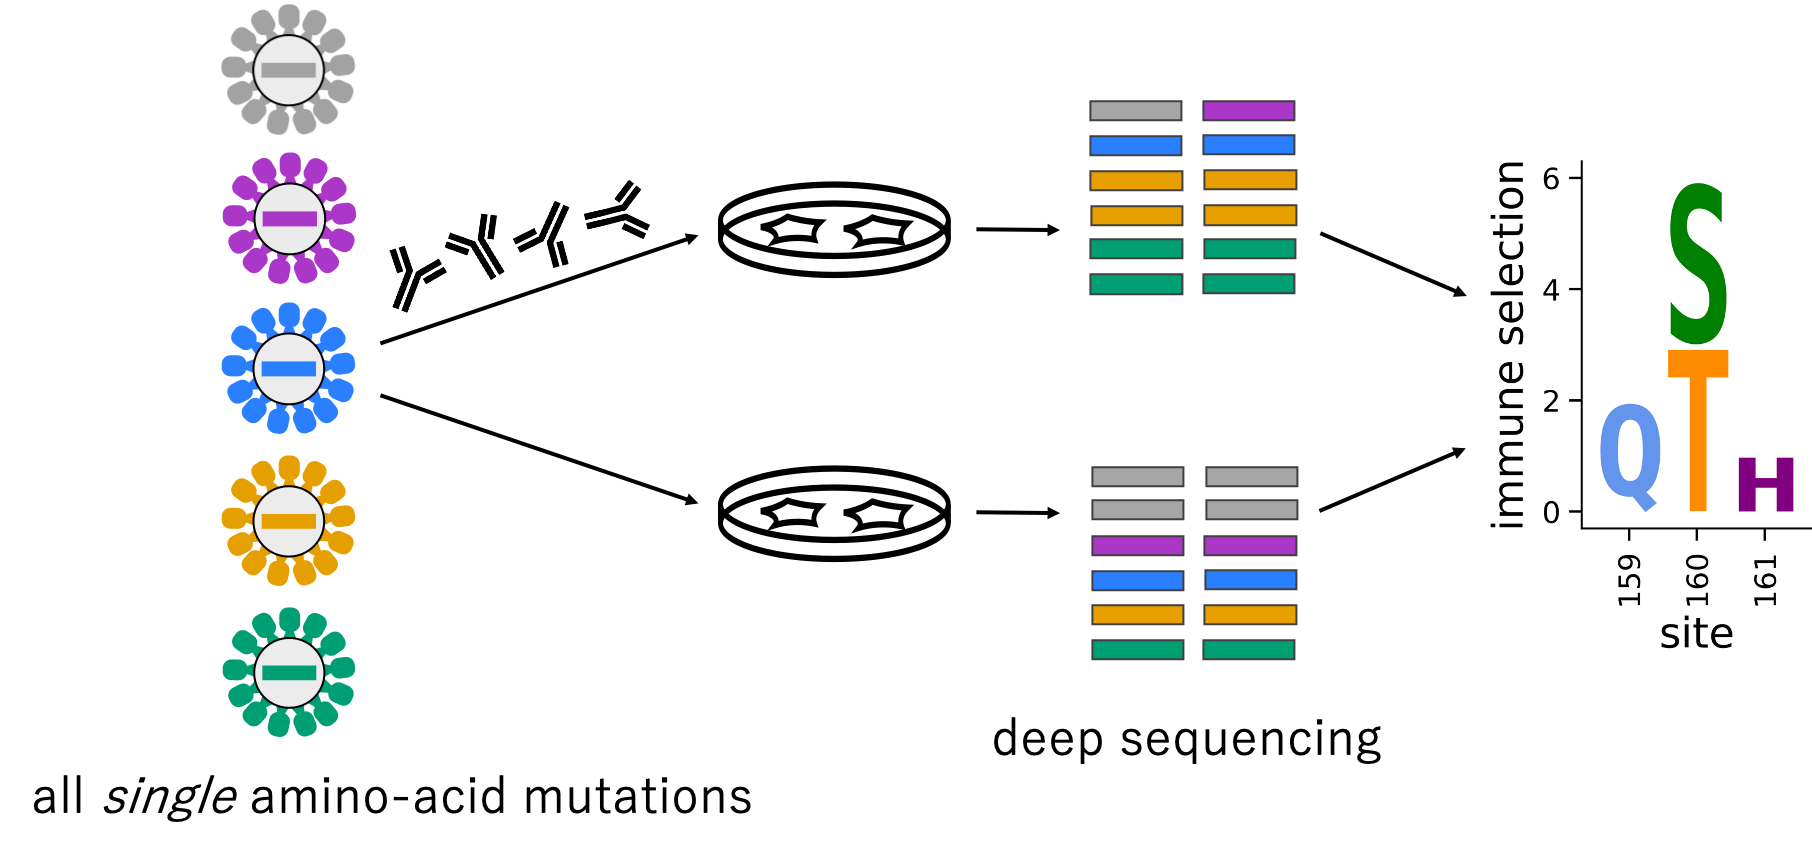
Deep Mutational Scanning primer
Deploy or develop dms-view
Tutorial
Goal
The goal of dms_view is to facilitate the analysis of deep mutational scanning experiments through interactive visualizations.
dms_view links together three pieces of information: a site-level summary metric, a mutation-level metric, and the 3-D protein structure.
This tutorial consists of two sections
Introduction
Layout
dms_view is broken into two sections: the data section and the description section.
The data section at the top of the page has three panels: the site panel, the mutation panel, and the protein structure panel. The site panel dot plot shows a summary value for each site in the experiment. When sites are selected, the individual mutation values are shown in the the mutation panel logoplot and the site is highlighted on the protein structure. You can change the data file or protein structure using the URL form fields above the panels.
The description section is at the bottom of the page. This flexible section can be used to hold information about the experiment, give credit to those who generated the data, or hold notes about a particular analysis. You can change the information using the URL form field above the section.
For more information on the data format for the data file, the protein structure, or the description file, please see the data upload page.
How you select sites
The goal of dms_view is to link site-level, mutation-level, and protein-structure information from a deep mutational scan.
When a site is selected on the site plot, its mutation-level information is shown below as a logoplot and it is highlighted on the protein structure.
Selecting sites
There are three ways to select a site in the site plot: clicking a site, brushing a site(s), or listing a specific site(s) by its label.
- Clicking on a site: You can click on a site using the mouse. Clicking on the site again will deselect the site.
- Brushing a site(s): You can brush several sites at once by clicking, holding, and swiping the mouse. Sites within the brush box will be selected.
- Listing a site(s): You can select a site by adding it to the selected site form field. This form field will also be updated with sites selected by clicking or brushing. The selected site field is a comma-separated list without leading or trailing spaces.
Deselecting sites
There are four ways to deselect a site in the site plot: clicking on a site, brushing a site(s), removing a site(s) from the selected site form field, or clicking the clear selections button.
- Clicking on a site: You can click on a site using the mouse.
- Brushing a site(s): You can brush several sites at once to deselect them by holding the shift key and clicking, holding, and swiping the mouse. Sites within the brush box will be deselected. You can also use the radio buttons to toggle between the select and deselect brush instead of the shift-key shortcut.
- Removing a site(s) from the selected site field: You can deselect a site by removing it from the selected site form field. The selected site field is a comma-separated list without leading or trailing spaces.
- Clicking on the clear selections button: You can clear all selected sites by clicking the clear selections button.
Navigation
There are two features to help you find a specific site in the site plot: site-plot tooltip and zoom bar.
- site-plot tooltip: You can hover over a site in the site plot and a tooltip will show some information about the site such as the label, the site-metric value, and the wildtype.
- zoom bar: You can zoom into a specific area of the site-plot using the zoom bar. If you brush (click, hold, and swipe) the zoom bar, the site-plot will zoom to the x-axis coordinates selected on the zoom bar.
What happens when you select a site
When a site is selected it is highlighted on the site plot, the protein structure and additional measurements are shown in the mutation plot.
The selected sites are colored the same on the protein structure and in the line plot. This color corresponds to the value of site-level metric. You can hover over the sites on the site plot or the protein structure to see a tooltip with more information about the site.
The mutation plot shows additional measurements at the selected site as a logoplot. In a typical deep mutational scanning experiment, multiple genetic variants are assayed at each site and the logoplot shows the effect of each amino acid at each site in the protein.
Dropdown menus
You can toggle between different datasets, different metrics, and different protein representations using the different dropdown menus.
Metric dropdowns
There is a dropdown menu for the site plot and the mutation plot to toggle between different metrics. These menus are autofilled based on the input data. For more information on the input data format, please see the data upload page.
Condition dropdown
Changing the condition dropdown changes the data that is shown in both the site plot and the mutation plot. For a typical deep mutational scanning experiment, these conditions would be different selection pressures. This menu is also autofilled based on the input data. For more information on the input data format, please see the data upload page.
Protein dropdown
You can toggle between different representations of the protein structure (cartoon, surface, etc) using the protein panel dropdown menu.
Custom colors for the protein structure
You can highlight the protein chains specified in the data file by coloring them differently than the other chains in the protein structure. Clicking the color options checkbox in the protein panel reveals two data fields. Enter a valid CSS color into the top or bottom field to color the “data chains” or “background chains”, respectively. To reset and return to the default color scheme, clear both data fields. Like the other user selections, the protein colors are tracked in the URL for easy sharing.
Sharing a state
dms_view tracks the state (the combination of data, dropdown menu selections and selected sites) in the URL.
If after exploring a dataset you find a view that you want to save or share with someone else, you simply need to copy the URL.
As an example, here are two different views of the same dataset with slightly different selections: view #1 and view #2
Saving images
You can save the current view of a panel by clicking the Download SVG or download PNG button. This button will download an SVG or PNG of that panel only, not of the whole tool.
Adding your own data to the site
dms_view uses three different files: the data file, the protein structure file, and the description file.
You can upload your data using each file’s specific form field. Please see the data upload page for specifics on the file formats for each file.
dms_view does not host the data itself, the files must be hosted on some other server such as GitHub.
Note that dms-view cannot load data from Dropbox or Google Drive links due to cross-origin resource restrictions implemented by those services.
Sample analysis
Here we will walk through a simple analysis of Influenza Virus data using dms_view.
Experimental setup
Lee et al., 2019 assayed the ability of every single amino-acid change in an Influenza Virus protein on its ability to abrogate binding to antibodies in human sera.
 We can compare sera from different people to see individual differences in Influenza Virus immunity.
Set up Analysis with dms-view
As mentioned above, dms_view takes up to three files: the data file with the deep mutational scanning measurements, the protein structure file, and the description file.
We followed the data upload guidelines and created a data file, a description file, and retrieved a protein structure for this experiment.
The conditions in this experiment are the sera from different individuals.
Analysis with dms-view
Here are three questions we might want to ask of this dataset.
(1) Are the sites most highly selected for the same between two different sera?
To answer this question, we first need to select sites of interest for one patient’s sera (‘2010-age-21’ sera top sites) and then change the condition dropdown to a new patient (‘2009-age-53’ sera with ‘2010-age-21’ top sites). By comparing these two views, we can see that there is no overlap in top sites between these two patient’s sera. Of course, you don’t need two separate links, you can toggle the condition dropdown menu yourself.
(2) If top sites are shared between patients, are the same amino-acid mutations important between the patients?
To answer this question, we need to find a pair of sera that share a top site and compare their mutation plots. ‘2009-age-64’ and ‘2009-age-65’ both selected site 159 strongly. By comparing these two views, we can see that while the overall stacks may differ, the amino acid with the largest effect is Glycine (G) in both conditions.
(3) Which regions of the protein structure are targeted by influenza immunity?
To answer this question, we need to select the top sites for each sera (‘2010-age-21’, ‘2009-age-53’, ‘2009-age-64’, and ‘2009-age-65’) and see where they fall on the protein structure. By comparing the different views, we can see that even though the sites are not exactly the same, they all target the “head” of the protein.